When it comes to dragon control the current meta stands in stark contrast to all that preceded it. For the majority of League of Legend's history the jungler could solo dragon fairly easily, demanding perpetual wards to keep dragon safe. It is only very recently that junglers stopped being considered a notable threat to dragon.
In the past junglers used to be able to solo dragon after their first clear, or even sooner in some special cases. As a result Riot increased the defenses of dragon, pushing out how quickly any jungler could manage this. Since then the jungle revamp nerfed Madred's and Wriggle's, making dragon even riskier. The jungle revamp also shifted the meta away from the bruiser junglers who excelled at taking dragon. Finally, warding became much more prevalent, especially with supports coming to lane with 3-4 wards. Combined, all these factors make solo dragon too risky for too little reward.
Today the norm is for dragon to be continually warded, but only taken when there's a significant advantage. Whether it's because the enemy jungler is ganking top, a nearby enemy has recalled, or an enemy was successfully ganked/killed, dragon is typically taken or attempted only when the enemy is limited to giving up or running headlong into a highly unfavorable situation. Attempting dragon at any other time is dangerous, similar to attacking an equal opponent under their tower.
Because of this the value of Wriggle's has declined greatly. I've stated in the past that Wriggle's is overrated, and it's even truer now. With dragon control being a team responsibility rather than a jungler-specific function it's simply unnecessary to build an item specifically for controlling dragon. Even on junglers who have potential synergy Wriggle's is no longer the best option.
Dragon control has fundamentally changed. Even though Wriggle's may see a resurgence in the future in double/triple Wriggle's compositions, dragon is no longer controlled by a jungler but by a team.

Showing posts with label control. Show all posts
Showing posts with label control. Show all posts
Monday, August 20, 2012

Tuesday, August 7, 2012
Jungling: Mid Lane Matters
The most important lane in the game for a jungler is the mid lane. All lanes are to varying degrees important, but the mid lane is critical to maintaining jungle control. If the mid lane loses, especially if it's a decisive loss, a jungler's life can become utterly miserable.
The importance of the mid lane bears similarities to the importance of the four center tiles in Chess. The central location of these tiles gives them power because they provide access to many parts of the board, which is why much of Chess involves fighting over these locations or finding clever ways around them. The mid lane in League of Legends is very much the same, it has the easiest access to every objective on the map.
As a result the mid lane has a dramatic influence on how well a jungler can control the jungle on both sides of the map. A weak mid lane can't contest or support invasions unless their opponent is inattentive, as otherwise they risk being intercepted and blown away by their laning opponent. For similar reasons a strong mid lane can support or be the instigator of invasions. A decisive loss mid lane opens up the entire jungle to the enemy, and can quickly collapse the other lanes as well.
This doesn't happen to the same extent with side lanes simply because of distances. The distance from top or bottom lane to any nearby buff camp is greater than the distance from the mid lane, and can be covered by a single ward. It's only when those lanes snowball to the point where they fearlessly push down a turret and past river that they become significant jungle threats.
Maintaining control of the mid lane is the key to maintaining jungle control. Unless your mid lane is a complete loss, it can be in your self-interest to help them get back on their feet. Any jungle farm you might lose by helping them might be lost anyway if your jungle becomes porous.
The importance of the mid lane bears similarities to the importance of the four center tiles in Chess. The central location of these tiles gives them power because they provide access to many parts of the board, which is why much of Chess involves fighting over these locations or finding clever ways around them. The mid lane in League of Legends is very much the same, it has the easiest access to every objective on the map.
As a result the mid lane has a dramatic influence on how well a jungler can control the jungle on both sides of the map. A weak mid lane can't contest or support invasions unless their opponent is inattentive, as otherwise they risk being intercepted and blown away by their laning opponent. For similar reasons a strong mid lane can support or be the instigator of invasions. A decisive loss mid lane opens up the entire jungle to the enemy, and can quickly collapse the other lanes as well.
This doesn't happen to the same extent with side lanes simply because of distances. The distance from top or bottom lane to any nearby buff camp is greater than the distance from the mid lane, and can be covered by a single ward. It's only when those lanes snowball to the point where they fearlessly push down a turret and past river that they become significant jungle threats.
Maintaining control of the mid lane is the key to maintaining jungle control. Unless your mid lane is a complete loss, it can be in your self-interest to help them get back on their feet. Any jungle farm you might lose by helping them might be lost anyway if your jungle becomes porous.
Monday, July 9, 2012
Jungling: The Young Lizard Dilemma
When stealing an enemy buff camp all junglers are faced with a common dilemma; do you leave one Young Lizard behind to delay the camp's respawn, or do you clear the entire camp? The answer is far more complicated than one might think.
At face value leaving one creep alive is the best option. This forces the enemy jungler to spend extra time clearing for little gain, and delays when the buff will reappear. That delay means less uptime for those critical buffs, weakening the enemy. By simply sparing one creep the enemy's time and resources are both wasted.
However, that analysis does not account for the value of information. Whoever clears the camp gains knowledge of the precise moment it will respawn. That simple timing gives a jungler control, the power to be in the right place at the right time. Clearing the camp hurts the enemy jungler's efficiency by denying them that critical information, and creates the potential for back to back buff steals.
Before you jump to the conclusion that this is a simple tradeoff between impact and control, stop and consider that there are three additional buff camps on the map and wards that can be strategically placed. These factors take what would otherwise be a simple situation and make everything immensely more complicated.
The first complication is the effect wards have on information. If a jungler leaves a ward behind at a stolen buff camp they'll be able to observe when it is cleared and thus know the exact timing of its respawn. With a little effort a jungler can guarantee themselves complete information whether they choose to fully clear a camp or not.
Adding to the confusion is the presence of other buff camps. At any one time there are as many as four buffs up at once, and two junglers who can only be in one spot at a time. Depending on a jungler's goals for the game, their team composition, and other factors either staggered or simultaneous respawns could be preferable. For example, if a jungler is stealing a camp at the same time their opponent is at the other camp, clearing results in a simultaneous respawn. This puts pressure on the enemy as they can't protect both camps on their own. Alternatively if both junglers are stealing each other's camps, then leaving a creep behind can potentially provide better jungle control. Because that jungler's buff will respawn first they can be present to defend it and have the potential to contest their opponent's buff. Controlling the buff camps is a complex juggling act that taxes even the most mobile, fast-clearing junglers.
The combination of complete information and juggling multiple buffs shifts the question away from impact versus control to an intricate dance of timings and intentions. What's most important is managing buff respawns to fit ideally with your team's demands and capabilities, not the minor inconveniences to the enemy jungler. The answer to the dilemma is the option whose respawn timing fits into a greater plan for controlling the jungle.
If that's too much for you do not fear, even the best junglers have trouble managing all these timers and events. Something as simple as covering a lane can throw them off. If you aren't at a point where you can handle the complex decision making, don't worry about it. Pick whichever option you like and stick with it until you feel ready to tackle the juggling act.
At face value leaving one creep alive is the best option. This forces the enemy jungler to spend extra time clearing for little gain, and delays when the buff will reappear. That delay means less uptime for those critical buffs, weakening the enemy. By simply sparing one creep the enemy's time and resources are both wasted.
However, that analysis does not account for the value of information. Whoever clears the camp gains knowledge of the precise moment it will respawn. That simple timing gives a jungler control, the power to be in the right place at the right time. Clearing the camp hurts the enemy jungler's efficiency by denying them that critical information, and creates the potential for back to back buff steals.
Before you jump to the conclusion that this is a simple tradeoff between impact and control, stop and consider that there are three additional buff camps on the map and wards that can be strategically placed. These factors take what would otherwise be a simple situation and make everything immensely more complicated.
The first complication is the effect wards have on information. If a jungler leaves a ward behind at a stolen buff camp they'll be able to observe when it is cleared and thus know the exact timing of its respawn. With a little effort a jungler can guarantee themselves complete information whether they choose to fully clear a camp or not.
Adding to the confusion is the presence of other buff camps. At any one time there are as many as four buffs up at once, and two junglers who can only be in one spot at a time. Depending on a jungler's goals for the game, their team composition, and other factors either staggered or simultaneous respawns could be preferable. For example, if a jungler is stealing a camp at the same time their opponent is at the other camp, clearing results in a simultaneous respawn. This puts pressure on the enemy as they can't protect both camps on their own. Alternatively if both junglers are stealing each other's camps, then leaving a creep behind can potentially provide better jungle control. Because that jungler's buff will respawn first they can be present to defend it and have the potential to contest their opponent's buff. Controlling the buff camps is a complex juggling act that taxes even the most mobile, fast-clearing junglers.
The combination of complete information and juggling multiple buffs shifts the question away from impact versus control to an intricate dance of timings and intentions. What's most important is managing buff respawns to fit ideally with your team's demands and capabilities, not the minor inconveniences to the enemy jungler. The answer to the dilemma is the option whose respawn timing fits into a greater plan for controlling the jungle.
If that's too much for you do not fear, even the best junglers have trouble managing all these timers and events. Something as simple as covering a lane can throw them off. If you aren't at a point where you can handle the complex decision making, don't worry about it. Pick whichever option you like and stick with it until you feel ready to tackle the juggling act.
Sunday, May 20, 2012
Jungling: Unopposed
Sometimes you may face a team without a jungler, leaving your top lane in a precarious 1v2 situation. With a jungler your team has an inherent advantage, but only so long as you take advantage of your position.
First and foremost you need to make sure your top lane is secure. While some champions can fare decently in a 1v2 situation, the vast majority can not. It's important to communicate with your top lane, gauge their confidence, and help them out preferentially (i.e. camp their lane). Winning a 1v2 top lane almost guarantees you'll win the game.
Next, take full advantage of the lack of a jungler on the enemy team. It should be impossible for them to get any of their buffs, dragon, or Baron. If your top lane is safe you can get obscene amounts of farm on the right jungler, enough to match solo lanes. So long as you don't neglect top lane your team's lead entering into the mid game is assured.
Finally, watch for desperate moves from the enemy team. Backed into a corner, the top lane duo is likely to roam and try to make plays in other lanes. This is particularly dangerous because your other teammates have likely been playing very aggressively without an enemy jungler to worry about. Stopping these last throes of enemy resistance will seal your victory, while ignoring them will drag out the game and potentially lead to defeat.
With enough experience it becomes relatively easy to punish the enemy team for failing to pick a jungler. Your team has inherent advantages, it's just a matter of learning to apply and extend them.
First and foremost you need to make sure your top lane is secure. While some champions can fare decently in a 1v2 situation, the vast majority can not. It's important to communicate with your top lane, gauge their confidence, and help them out preferentially (i.e. camp their lane). Winning a 1v2 top lane almost guarantees you'll win the game.
Next, take full advantage of the lack of a jungler on the enemy team. It should be impossible for them to get any of their buffs, dragon, or Baron. If your top lane is safe you can get obscene amounts of farm on the right jungler, enough to match solo lanes. So long as you don't neglect top lane your team's lead entering into the mid game is assured.
Finally, watch for desperate moves from the enemy team. Backed into a corner, the top lane duo is likely to roam and try to make plays in other lanes. This is particularly dangerous because your other teammates have likely been playing very aggressively without an enemy jungler to worry about. Stopping these last throes of enemy resistance will seal your victory, while ignoring them will drag out the game and potentially lead to defeat.
With enough experience it becomes relatively easy to punish the enemy team for failing to pick a jungler. Your team has inherent advantages, it's just a matter of learning to apply and extend them.
Tuesday, April 24, 2012
Jungling: Warding
In a duel between junglers, wards are supreme. A jungler's ability to gank, counter-jungle, and control the map are largely dictated by where each team has placed wards. Knowing where to place wards and where the enemy has placed theirs is critical to the role of a jungler.
It's the uncertainty that junglers bring to a game that makes wards so important. Simply by being shrouded in the fog of war a jungler exerts pressure, curbing offensive action by forcing opponents to second guess whether engaging is safe. Any information that allows you to know or estimate the position and intention of the enemy jungler is extremely valuable.
From just one small piece of information you can infer many things. For example, consider a level 2 gank. By ganking so early a jungler reveals not only their position but that they have yet to clear half their jungle. An enterprising opponent will therefore beeline for the undefended jungle, punishing the ganker. The enemies in other lanes can also rachet up their aggression as they know they are safe. Simply by knowing a jungler's location a team gains a significant advantage.
With that in mind, here are some important ward locations:
Location #1: Wraiths

Warding the enemy's wraiths is possibly the single best investment a jungler can make. Because wraiths are the easiest camp the clear, the fastest to respawn, and centrally located a ward placed there is extremely likely to spot the enemy jungler. It also allows you to know if wraiths are available to be stolen, and provides early warning if someone is coming to stop your counter-jungling. You shouldn't ward your own wraiths unless it's too dangerous to ward a more advantageous location.
Location #2: Opposite from Wraiths
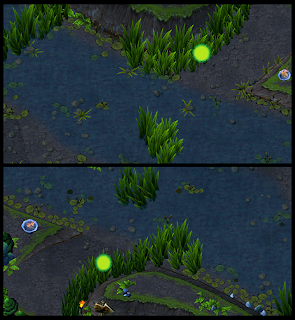
Any time you go to ward your own wraiths, think about warding here instead. These locations provide more information by also covering most of the river, protecting mid from jungle ganks, and protecting sidelanes from roaming opponents. The wards still cover the entirety of the ramp leading to wraiths, so it is impossible for an to sneak by them (without stealth).
With both locations 1 and 2 warded the most convenient paths for enemy junglers to counter-jungle are closed off. If you warded these locations first you can also guess when and if the enemy is placing similar wards. Combined with wards from top and bottom lanes it becomes impossible for the enemy jungler to leave their jungle unnoticed.
Location #3: Dragon

This is typically your support's responsibility, but in solo queue you can't guarantee that they'll consistently keep it warded. I've marked a few spots because dragon wards largely depend upon your side, blue or purple, and where your other wards are located. Pink wards, however, should almost always go in the marked spot. There are very few useful dragon ward locations which can't be seen from that spot.
There are many other good warding spots, but as a jungler these three are the most critical. With wards in these locations it becomes much easier to control the enemy jungler and their jungle. It's remarkable how much can be done when you know something as simple as the location of the enemy jungler.
It's the uncertainty that junglers bring to a game that makes wards so important. Simply by being shrouded in the fog of war a jungler exerts pressure, curbing offensive action by forcing opponents to second guess whether engaging is safe. Any information that allows you to know or estimate the position and intention of the enemy jungler is extremely valuable.
From just one small piece of information you can infer many things. For example, consider a level 2 gank. By ganking so early a jungler reveals not only their position but that they have yet to clear half their jungle. An enterprising opponent will therefore beeline for the undefended jungle, punishing the ganker. The enemies in other lanes can also rachet up their aggression as they know they are safe. Simply by knowing a jungler's location a team gains a significant advantage.
With that in mind, here are some important ward locations:
Location #1: Wraiths

Warding the enemy's wraiths is possibly the single best investment a jungler can make. Because wraiths are the easiest camp the clear, the fastest to respawn, and centrally located a ward placed there is extremely likely to spot the enemy jungler. It also allows you to know if wraiths are available to be stolen, and provides early warning if someone is coming to stop your counter-jungling. You shouldn't ward your own wraiths unless it's too dangerous to ward a more advantageous location.
Location #2: Opposite from Wraiths

Any time you go to ward your own wraiths, think about warding here instead. These locations provide more information by also covering most of the river, protecting mid from jungle ganks, and protecting sidelanes from roaming opponents. The wards still cover the entirety of the ramp leading to wraiths, so it is impossible for an to sneak by them (without stealth).
With both locations 1 and 2 warded the most convenient paths for enemy junglers to counter-jungle are closed off. If you warded these locations first you can also guess when and if the enemy is placing similar wards. Combined with wards from top and bottom lanes it becomes impossible for the enemy jungler to leave their jungle unnoticed.
Location #3: Dragon

This is typically your support's responsibility, but in solo queue you can't guarantee that they'll consistently keep it warded. I've marked a few spots because dragon wards largely depend upon your side, blue or purple, and where your other wards are located. Pink wards, however, should almost always go in the marked spot. There are very few useful dragon ward locations which can't be seen from that spot.
There are many other good warding spots, but as a jungler these three are the most critical. With wards in these locations it becomes much easier to control the enemy jungler and their jungle. It's remarkable how much can be done when you know something as simple as the location of the enemy jungler.
Subscribe to:
Posts (Atom)